This chapter contains the following topics:
Introduction to Purchase Order Forms
Defining Fields of Form Layouts
Selecting Alphanumeric Data Fields
PBS Purchase Order provides three different options for printing your purchase orders.
| • | You may print your purchase orders on standard pre-printed forms, available from most forms suppliers. The Passport Business Solutions Purchase Order supports forms designed for earlier pre-PBS versions 5 and 6. |
| • | You may print your purchase orders on plain 8 ¾ inch by 11 inch paper. |
| • | You may also design your own form layouts, using this purchase order selection to define the position of text and data on preprinted forms of your own design or on plain paper. |
| • | You may merge a graphical form file with purchase order data which may be printed on a printer or saved as a PDF file. |
This selection allows you to create custom purchase order form templates for use in your business.
To create a custom template or form layout, you must know what information you want to appear on the form and where the information will appear on the form. This selection will allow you to design a custom form, positioning text and data fields using column and row coordinates.
The most important part of this process will be the preparation. Take the time to read through this chapter to get an idea of the formatting options available to you before you begin the actual layout planning process.
Layouts for purchase orders are developed in each of three form sections:
| • | Header area |
| • | Line item area |
| • | Totals area |
Within each of these three areas, you will define the information that will be printed and where it will be printed. The information that will be print on your purchase order will come from two places.
| • | You may print the content of your purchase order data fields by selecting a particular field and locating it on your form layout. |
| • | You may define fields that print user defined text on your purchase orders. |
You may also want to merge the selected data with a file that contains a form image.
Select
Forms from the Master information menu.
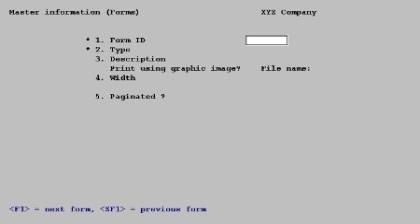
The following screen lets you work with new or existing form layouts for purchase orders, each identified by a unique Form ID.
Options
The following options are available to you:
|
<F1> |
For the next form layout that is on file. |
|
<SF1> |
For the previous layout on file. |
If you wish to work with an existing form, you may use the function keys to scroll through the file or you may enter the Form ID to display an existing form on the screen.
Options
The following additional options are available for an existing form.
|
<F2> |
To display a representation of the file. For more information see the section called Displaying a form later in this chapter. |
|
<F3> |
To delete a form layout. |
|
<F5> |
To test a form layout. This option will print a form layout to the selected printer. |
|
<F6> |
To copy the current form to a new Form ID. |
*1. Form ID
This is the Form ID that uniquely identifies, along with the Type, each form layout. You may enter an ID that is not on file to create a new form or enter the ID of a layout that is already on file to modify or delete the layout.
|
Format |
Five characters |
|
Example |
Type: 2 |
*2. Type
Enter the form type you wish to define. You may define the form as a purchase order.
|
P |
To define a purchase order form layout. |
|
Format |
One character |
|
Example |
Type: P |
If a layout with this Form ID and Type is on file, it will display. You may modify or delete the layout.
3. Description
Enter a description of the form layout.
|
Format |
30 characters |
|
Example |
Type: XYZ Company Purchase Order |
Print using graphic image?
Answer Y to use a form image form file to merge with the data or N to print without an image file.
See the Form File Use and Design section in the More on PBS Printing chapter In the PBS Administration documentation to learn more about modifying the PBS graphical file examples or creating your own from scratch.
|
Format |
One letter, either Y or N, default is Y |
|
Example |
Type Y |
If you answer Y, then you will be prompted to enter the name of the form file.
File name:
Enter the name of the file that will merge with the purchase order data. This JPEG or Bitmap file must be present in the top-level PBS directory - IMAGES.
You must enter this field so that it is spelled exactly as the file name with the proper extension.
|
Format |
12 characters, but the extension must be either .jpg or .bmp. |
|
Example |
Enter FORMPO.JPG |
If you are using a graphical image form file, then you must select Windows printer or a Company information PDF printer to print statements. Other non-PDF printers defined in Company information will not merge the image form file with the data.
PDF Purchase Order Generation
When you print the purchase order with a Company information -PDF- printer, the program generates a PDF file for each purchase order in the PDFFIL\PURCHASEORDERS directory. The name of each file will momentarily display on the screen as it is being created. An example of the P/O PDF file name is xx_PON_100_001113.PDF. The xx indicates the company number. The PON means it is a new purchase order. The ‘100’ is the vendor number and the ‘001113’ is the purchase order number.
You may also print and generate PDF files simultaneously using a -PDFP- Company information printer.
Viewing and Emailing Purchase Orders
Because many files could be generated, they will not display during the print selection process. However, you may view the generated PDF files from the Ctl menu selection Email/view printed PDF's, located under the main menu selection PDF form file processing by using either Adobe™ Acrobat™ and Adobe Reader™. From that same menu selection you may also email PDF files. When viewing each Purchase order type, they have different designations. For user information on using the PDF form file processing features, see the PDF Form File Processing chapter in the System documentation.
The following is a list of types with the associated menu selections:
|
Type |
Menu Selection |
User Designed Form |
|
PONew |
Purchase orders > Print new P.O.'s * |
No |
|
POChg |
Changes to P.O.'s > Print changed P.O.'s * |
No |
|
POPrt |
Print purchase orders * |
No |
|
PORel |
Releases > Print released P.O.'s * |
No |
|
POFNw |
Forms > Printed released P.O.'s |
Yes |
|
POFCh |
Forms > Change P.O.'s forms |
Yes |
|
POFPt |
Forms > Print P.O.'s forms |
Yes |
| POFRl | Forms > Release P.O.'s forms |
Yes |
* You must set up fields in Control information to print these purchase orders. See the Control Information chapter.
To setup emailing see the appendix Email Configuration in the PBS Administration documentation.
4. Width
Enter the width of the form in print columns. You may create a form that contains up to 132 columns.
|
Format |
999 up to 132 |
|
Example |
Type: 80 |
5. Paginated
Decide whether this form will be paginated. If you answer Y to this option, form feeds will be issued after the number of lines specified. If you answer N, no form feed will be issued by the software.
|
Format |
One character, either Y or N |
|
Example |
Type: Y |
The following fields, #6 through #10 are displayed only if you answered Y to pagination.
6. Length
You are allowed to specify the number of rows or lines that are counted on each page before a form feed is issued by the software. Enter the number of rows for this form.
|
Format |
999 |
|
Example |
Type: 66 |
If you are merging data with a graphic form file, you may want to start with 60 lines and work the number of lines up from there. Most windows printers will not allow printing 66 lines at 6 lines per inch.
7. First line for headers
Enter the row number on which you want the first line of header information to print. The number entered here must be less than or equal to the number for form length.
|
Format |
999 |
|
Example |
Type: 4 |
8. Headers 1st page only ?
Answer Y if you want header information printed on the first page only. Answer N to print header information at the top of every page.
|
Format |
Either Y or N |
|
Example |
Type: N |
9. First line for line items
Enter the row number on which you want the first line item to start printing. The number entered here must be greater than the number entered for the First line for headers.
|
Format |
999 |
|
Example |
Type: 24 |
10. Last line for line items
Enter the row number of the last row in the line item area. Line item information will not print below this row. This number must be greater than or equal to the First line of line items.
|
Format |
999 |
|
Example |
Type: 54 |
11. First line for totals
Enter the row number of the first row of the totals section. This line must be greater than the Last line for line items.
|
Format |
999 |
|
Example |
Type: 57 |
Field number to change ?
Make any needed changes. Upon pressing <Enter> with this field blank, the screen will be cleared and the cursor positioned for the entry of layout fields within the Header area, the Line item area or the Totals area.
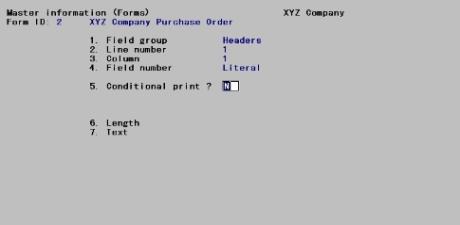
The following screen is displayed:

At this time you may enter fields within any one of the three layout areas. You define the area that you want the particular field to be placed by typing an H, an L or a T in the Field group field.
After you have defined an overall layout for your purchase order, you are ready to define specific fields and locate them on your form layout.
1. Field group
Enter a letter to designate the area of the form where this field will reside.
|
H |
To locate this field in the Header section of the form. |
|
L |
To locate this field in the Line item section of the form. |
|
T |
To locate this field in the Totals section of the form. |
|
Format |
One character, from the option list |
2. Line number
Specify the row within the selected form area that this field will print on. The range of valid rows will be dependent on how you defined the area you selected in the Field group field. The range allowed will be relative to the area you are working in rather than to the entire form layout.
|
Format |
999 |
3. Column
Specify the starting column in which to print this field. The allowed values in this field will be dependent on the form width that you defined.
|
Format |
999 |
4. Field number
Depending on your entry in this field, you will define and locate user-defined text that will be printed on the purchase order, alphanumeric fields from your Purchase Order data files, numeric fields from your Purchase Order data files or with date fields from your Purchase Order data files.
From field #4, Field number, the following options are available to you.
| • | Press <Enter> to create a user-defined text field (Literal). The literal that you define here will print on your purchase order in the location that you define on this form layout. |
| • | Select an alphanumeric format field from your Purchase Order data files. |
| • | Select a numeric format field from your Purchase Order data files. |
| • | Select a date format field from your Purchase Order data files. |
Depending on the action you take from the Field number field you will build your form layout according to the parameters allowed for the type of data you are working with.
If you press <Enter> while the cursor is positioned in field #4, the field will be filled with the word Literal and the following screen displays:
You may enter the following information according to the format and rules for each field.
5. Conditional print ?
Your response here will define the conditions, under which this field will print on the purchase order. If you answer N, this text literal will print without condition. If you answer Y, you will be prompted to define the condition, under which this field will be printed on the purchase order.
|
Format |
One character, either Y or N |
A screen similar to the following displays if you select Y for the Conditional print field:
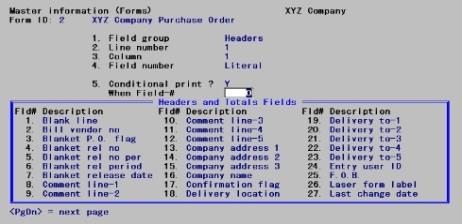
The conditional statement is comprised of the field literal data that you are defining in this function, a conditional operator as listed below and a user-defined value.
The format is:
When Field-# [Selected field]
is [Conditional operator][User-defined value]
To define the conditional statement, first select a field from the list displayed.
Next, select one of the conditional operators.
|
Note |
The operators described here are also available when defining alphanumeric, numeric and date fields as described later in this chapter. |
|
EQ |
Text prints when the content of the data field is equal to a value you define. |
|
NE |
Text prints when the content of the data field is not equal to a value you define. |
|
GT |
Text prints when the content of the data field is greater than a value you define. |
|
LT |
Text prints when the content of the data field is less than a value you define. |
|
GE |
Text prints when the content of the data field is greater than or equal to a value you define. |
|
LE |
Text prints when the content of the data field is less than or equal to a value you define. |
After entering a conditional operator, you will be prompted to enter a conditional string. This is the string that your literal will be compared to when making the decision to print the text on the form.
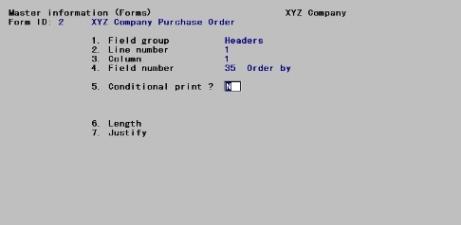
If you answer N to this question or you have finished entering Conditional print information, you will be prompted to enter the length of the field and the alignment of the information within the field.
6. Length
Enter the number of columns that this field will occupy on your form. A maximum number will be displayed.
|
Format |
999 “up to the Max”: displayed on the screen. |
7. Justify
Enter a code that determines how the text is aligned within the field you have defined.
|
R |
To right justify the text within the field. |
|
<Enter> |
For none. |
|
Format |
One character |
When you are finished defining this field, you will be given the opportunity to view the form layout as defined.
Field number to change ?
Make any needed changes. Upon pressing <Enter> with this field blank, the screen will be cleared and the cursor positioned for the entry of another field.
Instead of pressing <Enter> while the cursor is positioned in field #4 select a field from the Purchase Order data files listed. This section describes the process for defining and locating alphanumeric fields on your form layout.
A screen similar to the following will be displayed:
You may enter the following information according to the format and rules for each field.
5. Conditional print ?
Your response here will define the conditions under which this field will print on the purchase order. If you answer N, the content of the data field you selected will print without condition. If you answer Y, you will be prompted to define the condition, under which this data will be printed on the purchase order.
|
Format |
One character, either Y or N. |
The conditional statement is comprised of the content of the field that you are defining in this function, a conditional operator as listed below and a user-defined value.
The format is:
When Field-# [Selected field] is [Conditional operator][User-defined value]
To define the conditional statement, select a field from the list displayed.
Next, select one of the conditional operators as described in the previous section on user-defined text fields.
After entering a conditional operator, you will be prompted to enter a conditional value. This is the value that your data field content will be compared to when making the decision to print the contents of the field on the form.
If you answer N to this question or you have finished entering Conditional print information, you will be prompted to enter the length of the field and the alignment of the information within the field.
6. Length
Enter the number of columns that this field will occupy on your form. A maximum number will be displayed based on the definition of the data field you have selected.
|
Format |
999 “up to the Max”: displayed on the screen. |
7. Justify
Enter a code that determines how the text is aligned within the field you have defined.
|
R |
To right justify the content within the field. |
|
<Enter> |
For none. |
|
Format |
One character, R or press <Enter> |
When you are finished defining this field, you will be given the opportunity to view the form layout as defined.
Field number to change ?
Make any needed changes. Upon pressing <Enter> with this field blank, the screen will be cleared and the cursor positioned for the entry of another field.
If you select a numeric data field from the list of fields displayed, the processing will proceed a little differently than the processing for a text literal or an alphanumeric field. Select one of the fields from the list displayed.
A screen similar to the following displays:

You may enter the following information according to the format and rules for each field.
5. Conditional print ?
Your response here will define the conditions under which this field will print on the purchase order. If you answer N, the content of the data field you selected will print without condition. If you answer Y, you will be prompted to define the condition, under which this data will be printed on the purchase order.
|
Format |
One character, either Y or N |
The conditional statement is comprised of the content of the field that you are defining in this function, a conditional operator as listed below and a user-defined value.
The format is:
When Field-# [Selected field] is [Conditional operator][User-defined value]
To define the conditional statement, select a field from the list displayed.
Next, select one of the conditional operators as described in the earlier section on user-defined text fields.
After entering a conditional operator, you will be prompted to enter a conditional value. This is the value that your data field content will be compared to when making the decision to print on the form or not.
If you answer N to this question or you have finished entering Conditional print information, you will be prompted to enter the length of the field and the alignment of the information within the field.
6. Integer digits
Enter the number of digits that will be printed to the left of the decimal point on your form. A maximum number will be displayed based on the definition of the data field you have selected.
|
Format |
999 “up to the Max”: displayed on the screen. |
7. Decimal digits
Enter the number of digits that will be printed to the right of the decimal point on your form.
|
Format |
9 |
|
Example |
Enter 9 for Float |
|
Format |
999 “up to the Max”: displayed on the screen. |
8. Commas ?
Your answer to this question will determine whether commas will be printed when the value in this field exceeds 999.
|
Format |
One character, either Y or N. |
9. Leading zeros ?
Your answer to this question will determining whether your data is displayed with leading zeros.
|
Format |
One character, either Y or N. |
10. Negatives ?
This field allows you to define the format applied to negative numbers when encountered.
|
R |
A minus sign will be displayed to the right of the negative number. |
|
L |
A minus sign will be printed to the left of the negative number. |
|
F |
A floating minus sign will be displayed to the left of the negative number. |
|
C |
A credit symbol, CR, will be displayed to the left of the negative number. |
|
P |
The negative number will be enclosed in parenthesis. |
|
Format |
One character, form the list of options |
When you are finished defining this field, you will be given the opportunity to view the form layout as defined.
Field number to change ?
Make any needed changes. Upon pressing <Enter> with this field blank, the screen will be cleared and the cursor positioned for the entry of another field.
Instead of pressing <Enter> while the cursor is positioned in field #4 select a field from the purchase order data files listed. This section describes the process for defining and locating date fields on your form layout.
A screen similar to the following displays:
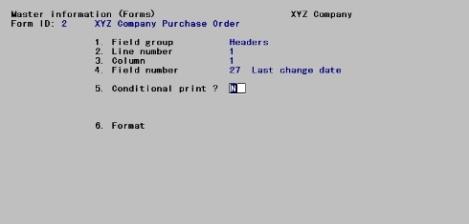
You may enter the following information according to the format and rules for each field.
5. Conditional print ?
Your response here will define the conditions, under which this field will print on the purchase order. If you answer N, this content of the data field you selected will print without condition. If you answer Y, you will be prompted to define the condition, under which this data will be printed on the purchase order.
|
Format |
One character, either Y or N |
The conditional statement is comprised of the content of the field that you are defining in this function, a conditional operator as listed below and a user-defined value.
The format is:
When Field-# [Selected field] is [Conditional operator][User-defined value]
To define the conditional statement, select a field from the list displayed.
Next, select one of the conditional operators as described in an earlier section of user-defined text fields.
After entering a conditional operator, you will be prompted to enter a conditional value. This is the value that your data field content will be compared to when making the decision to print on the form or not.
If you answer N to this question or you have finished entering Conditional print information, you will be prompted to select the format of the date when it’s printed on your form.
6. Format
Select a format for the date when it’s printed on your purchase order.
|
R |
To right justify the content within the field. |
|
<Enter> |
For none. |
|
Format |
999 “up to the Max”: displayed on the screen. |
When you are finished defining this field, you will be given the opportunity to view the form layout as defined.
Field number to change ?
Make any needed changes. Upon pressing <Enter> with this field blank, the screen will be cleared and the cursor positioned for the entry of another field.
When you are done with the layout of your form, press <Esc> to exit this function.
While entering a form, you can press <F2> to see what the form looks like so far. Follow the screen instructions.
If one field overlaps another field, either question marks or asterisks appear in the area of overlap.
Question marks display if none of the overlapping fields are conditionally printed, in which case you probably need to change the position of a field.
Asterisks display if at least one of the overlapping fields is conditionally printed. In this case, you may wish to review the definitions of the overlapping fields to ensure that they do not print under the same conditions.
Displaying a form will not merge the form file.
Once you have created a form, you must test it to make sure that it is viable. You may do this by printing an alignment form that will allow you to verify that the layout is correct without printing actual purchase orders.
Select
Forms from the Master information menu.
*1. Form ID
Enter the Form ID of the Layout that you want to test.
When the layout is displayed, use the <F5> option to print your form layout to a selected printer.